Complete Bonsai Repotting Guide - Step by Step
Complete Bonsai Repotting Guide
Repotting is one of the most important aspects of bonsai care. It refreshes the soil, allows root pruning, and ensures your bonsai has the nutrients and drainage it needs to thrive.
When to Repot Your Bonsai
Timing by Species
- Deciduous trees (Chinese Elm, Japanese Maple): Early spring, just before bud break
- Evergreen trees (Juniper, Pine): Late winter to early spring
- Tropical species (Ficus, Jade): Any time during growing season
Signs It’s Time to Repot
- Roots circling the pot bottom
- Water drains too quickly or too slowly
- Soil looks compacted or depleted
- Tree shows reduced growth or yellowing
- It’s been 2-3 years since last repotting
Essential Tools & Materials
Must-Have Tools
- Bonsai shears for root pruning
- Root hook or chopstick for root teasing
- Wire mesh for drainage holes
- Bonsai soil mix (akadama, kanuma, pumice)
- Clean pot with drainage holes
Recommended Products
Professional Bonsai Tool Set
$89.99Complete 14-piece bonsai tool kit with shears, wire cutters, and root hooks
Premium Bonsai Soil Mix - 5 Quart
$34.99Professional-grade akadama, kanuma, and pumice blend for perfect drainage
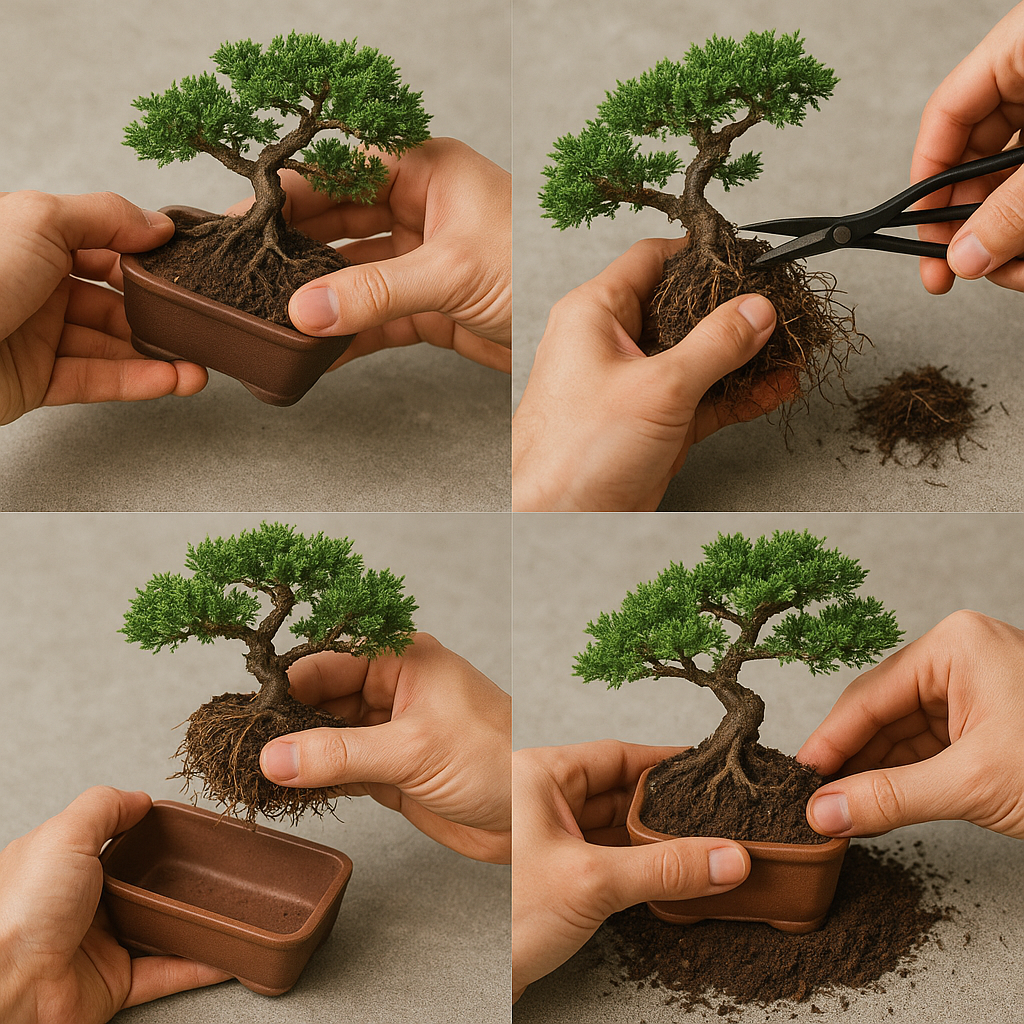
Step-by-Step Repotting Process
Step 1: Preparation (1-2 days before)
- Water your bonsai thoroughly 24 hours before repotting
- Prepare your workspace with all tools and materials
- Select appropriate pot (1-2 inches larger than current)
- Mix fresh bonsai soil if needed
Step 2: Remove from Current Pot
- Gently tap the pot to loosen the root ball
- Slide the tree out carefully supporting the trunk
- Remove old soil by gently teasing roots with root hook
- Inspect root system for health and structure
Step 3: Root Pruning
- Remove circling roots that grow around the pot
- Cut away dead or rotten roots with clean shears
- Reduce root mass by 1/3 for deciduous trees
- Reduce root mass by 1/4 for evergreen trees
- Apply wound sealant to large root cuts
Step 4: Prepare New Pot
- Cover drainage holes with mesh screen
- Add layer of fresh soil in bottom of pot
- Position tree at correct angle and depth
- Add soil around roots working it in gently
Step 5: Final Setup
- Water thoroughly to settle soil
- Place in shaded area for 2-3 weeks recovery
- Monitor closely for signs of stress
- Resume normal care gradually
Common Repotting Mistakes to Avoid
❌ Don’t Do This:
- Repotting at the wrong time of year
- Using garden soil instead of bonsai mix
- Over-pruning roots (remove no more than 1/3)
- Watering too much immediately after repotting
- Placing in direct sun right after repotting
✅ Do This Instead:
- Choose the right timing for your species
- Use well-draining bonsai soil mix
- Prune roots conservatively
- Water thoroughly but allow to dry between waterings
- Provide shade and protection during recovery
Aftercare & Recovery
First 2-3 Weeks
- Keep in shaded area protected from wind
- Water when top inch of soil is dry
- Mist leaves daily to maintain humidity
- Monitor for signs of stress (yellowing, wilting)
Ongoing Care
- Resume normal watering after recovery period
- Begin fertilizing 4-6 weeks after repotting
- Monitor root development through drainage holes
- Plan next repotting in 2-3 years
Species-Specific Repotting Notes
Juniper Bonsai
- Best repotted in late winter
- Tolerate more root pruning
- Need excellent drainage
- Recovery time: 3-4 weeks
Ficus Bonsai
- Can be repotted year-round
- Fast recovery (2-3 weeks)
- Need rich, well-draining soil
- Sensitive to cold after repotting
Jade Bonsai
- Best in spring or summer
- Very tolerant of root pruning
- Need gritty, fast-draining soil
- Recovery time: 2-3 weeks
🛒 Essential Repotting Supplies
Professional Tools
Bonsai Root Hook & Rake Set
$24.99Stainless steel root hooks for gentle root teasing and soil removal
Soil & Drainage
Bonsai Pot Drainage Mesh - 10 Pack
$12.99Professional drainage screens prevent soil loss while maintaining airflow
Complete Repotting Kit
Professional Bonsai Repotting Kit
$127.99Everything needed: tools, soil, mesh, and wound sealant for perfect repotting
Troubleshooting Repotting Issues
Tree Wilting After Repotting
- Cause: Shock from root pruning or environmental change
- Solution: Provide shade, maintain humidity, reduce watering
- Timeline: Usually resolves in 2-3 weeks
Yellow Leaves After Repotting
- Cause: Stress from repotting process
- Solution: Ensure proper watering and light conditions
- Timeline: Should improve as new roots develop
Poor Drainage in New Pot
- Cause: Insufficient drainage holes or compacted soil
- Solution: Add more drainage material or improve soil mix
- Prevention: Always test drainage before final potting
Advanced Repotting Techniques
Root Grafting
- Technique for improving nebari (root spread)
- Best done during repotting
- Requires clean cuts and proper alignment
Soil Layering
- Different soil compositions for different root zones
- Improves drainage while maintaining moisture
- Advanced technique for established trees
Pot Selection Strategy
- Consider tree style and species requirements
- Balance between aesthetics and tree health
- Plan for future development and growth
Success Metrics
What to Expect After Repotting
- Week 1-2: Some stress, possible yellowing
- Week 3-4: New root growth begins
- Week 5-8: Visible recovery and new growth
- Month 3+: Full establishment in new pot
Signs of Successful Repotting
- New growth appearing
- Healthy leaf color returning
- Vigorous root development
- Improved overall tree health
Remember: Repotting is stressful for your bonsai, but when done correctly, it leads to healthier, more vigorous growth. Take your time, follow the steps carefully, and your bonsai will thank you with years of beautiful growth.
Need Help with Repotting?
Our expert consultation service can guide you through the repotting process for your specific bonsai:
1-on-1 Repotting Consultation
$4530-minute video call with bonsai expert to guide your repotting process
Pro Tip: Each purchase through our affiliate links helps us create more free bonsai care content for the community!